
Once you install the app, you’ll see the available Quick Actions which correspond to the pages in the left-hand menu.
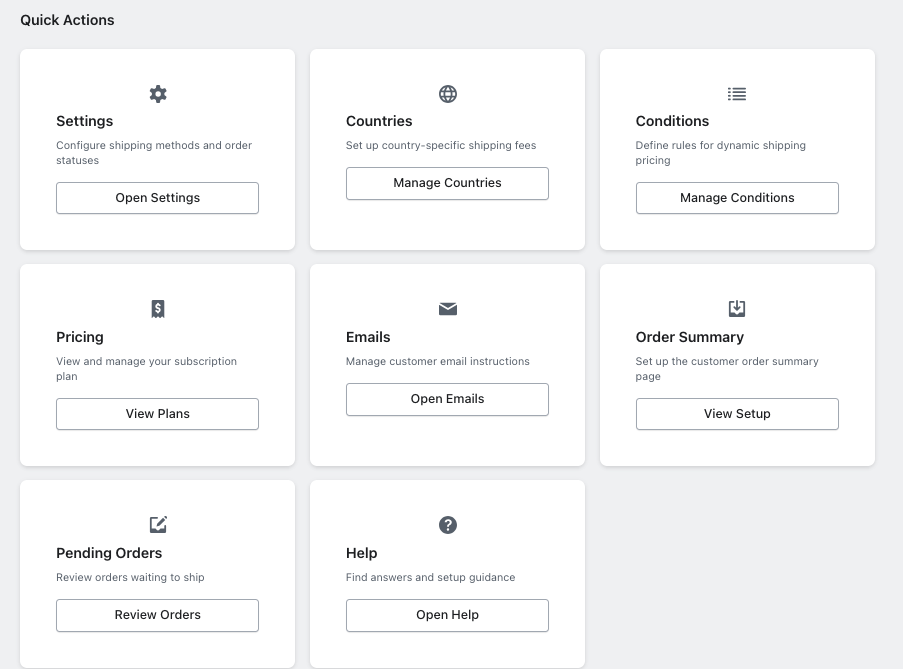
We will go over the following sections:
- Pricing
- Settings
- Countries
- Conditions
- Emails
- Order Summary
- Pending Orders
- Help
1. Choose your plan
All plans except Enterprise include a usage-based overage system. If you exceed your monthly order limit, you’ll be charged the overage fee per additional order. Usage caps vary by plan.
2. Settings
Delivery Profiles
Select the Shopify delivery profile(s) applicable to this shipping method.
Every Shopify store has at least one profile (the default “General” profile).
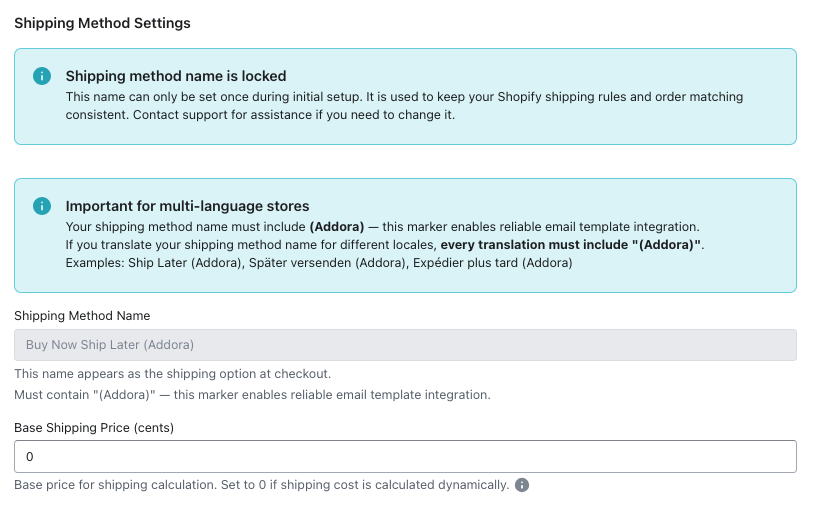
Shipping Method Settings
- Shipping method name: Give your new shipping method a simple, memorable name. This will appear in your store’s check out page.
IMPORTANT Your shipping method name must include (Addora) at the end for the app to enable reliable email integration, which is required for your customers to receive the correct notifications.
IMPORTANT If your store uses multiple languages, ensure every translated version of your shipping method name includes “(Addora)”. The marker must be exactly “(Addora)” with parentheses.
IMPORTANT Once you save your shipping method name, it can’t be modified as it is used to keep your conditions and order matching consistent. Please contact support for assistance if you need to change it.
- Base Shipping Price (cents): Once the customer confirms to ship their purchased items, the base shipping fee set here will be applied at checkout.
Set this value to 0 if shipping costs vary by country which can be configured under Country. Any additional fees, discounts, or conditions can be configured under Conditions.
The amount is entered in cents (e.g. 500 = $5.00).
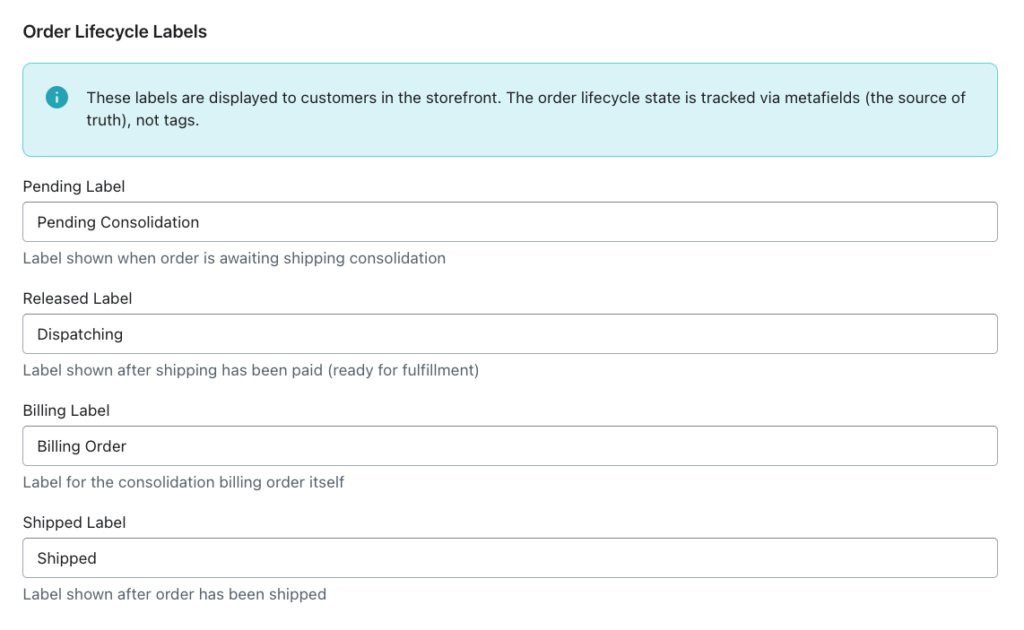
Order Lifecycle Labels
Customize the labels shown for orders at different stages of the shipping process. These labels appear in your store, allowing customers to easily identify the current status of their order.
- Pending Label: Label shown after customers make a purchase using this shipping method (e.g. Pending shipment confirmation).
- Released Label: Label shown after customers confirm to ship and pay the shipping fee, if any (e.g. Ready to dispatch).
- Billing Label: Label to identify the billing order itself of paid shipping fee (e.g. Billing order).
- Shipped Label: Label shown after the order is shipped (e.g. Shipped).
Click Save Settings.
Order Tags (Optional)
Configure the optional tags below only if you need them for custom automations or for administrative filtering purposes.
Click Save Settings.
3. Countries
Add Country
Here you can add additional shipping fees for specific countries. These fees will be applied on top of the base shipping rate configured in Settings.
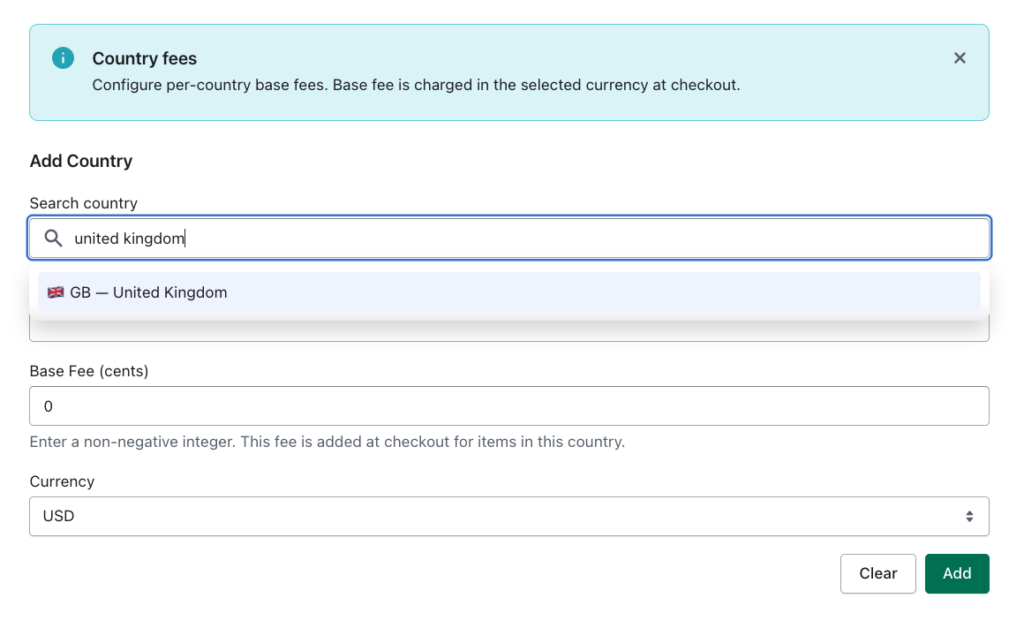
Simply search for the country, enter the amount in cents and click Add. The currency will automatically adjust based on the country, or you can manually select a different currency if needed.
The amount is entered in cents (e.g. 500 = $5.00).
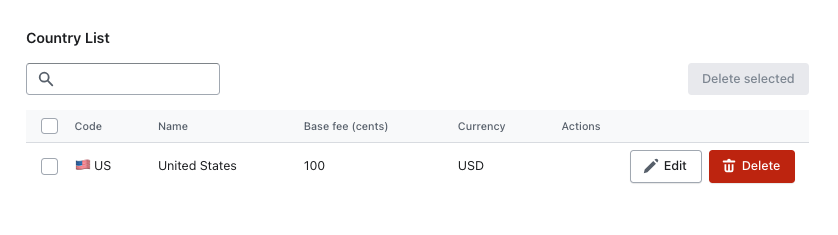
Country List
This list displays all the countries where you’ve added custom shipping fees. You are able to make quick edits here directly or simply delete a country fee.
4. Conditions
Condition Type
Select what the additional fee or discount will be based on:
- Weight (kg) – total weight of selected orders to be shipped
- Price – total price of selected orders to be shipped
- Quantity – number of selected orders to be shipped
Range
Set the minimum and maximum values for when this condition applies by entering values into Min and Max.
Adjustment Type
- Additional fee (cents) – adds a fixed amount on top of the shipping fee depending on your carrier or delivery profile, base fee configured in Settings, and any country-specific fees, as long as the condition is met
- Discount – subtracts a fixed amount or percentage from each of the following: shipping fee, base fee, country-specific fees, and additional fees if configured, as long as the condition is met
- Free Shipping – removes all shipping fees for this shipment and overrides the shipping fee, base fee, country-specific fees, and additional fees if configured, as long as the condition is met
Tick Active to enable the condition, then click Add Condition.
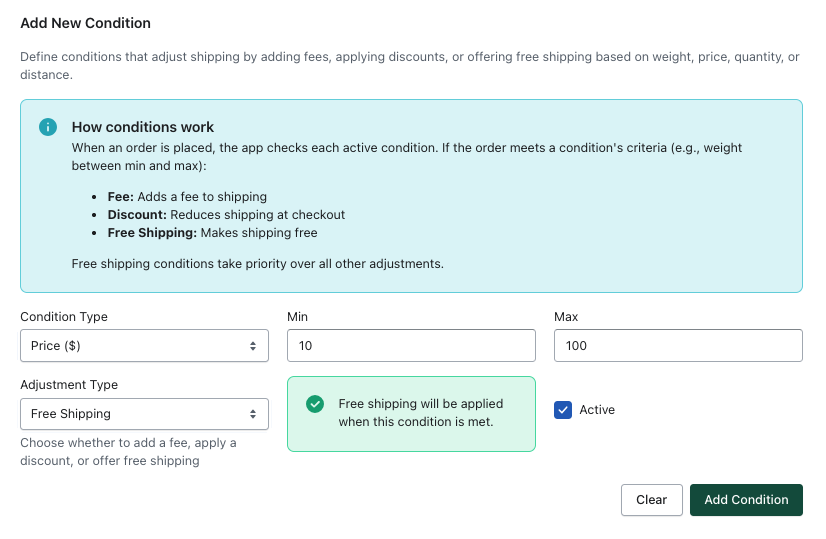
Example
For a condition based on price:
If free shipping applies between Min $10 and Max $100, and the customer selects 3 orders totaling $40, the shipment qualifies for free shipping.
Existing Conditions
Here you’ll see all your saved conditions. You can quickly edit them here, including enabling or disabling a condition by ticking or unticking Active.
5. Emails
Follow the steps below to edit the email notification (Shopify’s default Order confirmation template) that is automatically sent to customers when they make a purchase. This ensures customers understand that their items will not be shipped until they confirm.
Open: Shopify dashboard → Settings → Notifications → Customer notifications → Order confirmation → Edit code
- Replace the Email subject with the snippet below.
{%- assign has_addora_method = false -%}{%- for sm in shipping_methods -%}{%- if sm.title contains ‘(Addora)’ -%}{%- assign has_addora_method = true -%}{%- break -%}{%- endif -%}{%- endfor -%}{% if attributes[‘_is_consolidation’] == ‘true’ %}Shipping charge received for {{ name }}{% elsif has_addora_method or attributes[‘_addora_ship_later’] == ‘true’ %}Order {{ name }} confirmed, pending shipment{% else %}Order {{ name }} confirmed{% endif %}
- Under Email body (HTML), paste the snippet below in line 1
{%- assign is_consolidation = false -%}
{%- assign is_ship_later = false -%}
{% comment %}Primary detection: shipping method title contains (Addora) – works across translations{% endcomment %}
{%- for shipping_method in shipping_methods -%}
{%- if shipping_method.title contains ‘(Addora)’ -%}
{%- assign is_ship_later = true -%}
{%- break -%}
{%- endif -%}
{%- endfor -%}
{% comment %}Fallback detection: order attributes (legacy support){% endcomment %}
{%- assign v = attributes[‘_is_consolidation’] | default: ” | downcase -%}
{%- if v == ‘true’ -%}{%- assign is_consolidation = true -%}{%- endif -%}
{%- assign v = attributes[‘_addora_ship_later’] | default: ” | downcase -%}
{%- if v == ‘true’ -%}{%- assign is_ship_later = true -%}{%- endif -%}
- Use Ctrl+F and look for email_title
Replace the following
{% capture email_title %}
{% if has_pending_payment %}
Thank you for your order!
{% else %}
Thank you for your purchase!
{% endif %}
{% endcapture %}
With
{% capture email_title %}
{% if has_pending_payment %}
Thank you for your order!
{% else %}
{% if is_consolidation %}
Shipping charge received
{% elsif is_ship_later %}
Order confirmed, shipping later
{% else %}
Thank you for your purchase!
{% endif %}
{% endif %}
{% endcapture %}
- Use Ctrl+F and look for {% if requires_shipping %}
Replace the following
{% if requires_shipping %}
{% case delivery_method %}
{% when ‘pick-up’ %}
You’ll receive an email when your order is ready for pickup.
{% when ‘local’ %}
Hi {{ customer.first_name }}, we’re getting your order ready for delivery.
{% else %}
We’re getting your order ready to be shipped. We will notify you when it has been sent.
{% endcase %}
{% if delivery_instructions != blank %}
<p><b>Delivery information:</b> {{ delivery_instructions }}</p>
{% endif %}
{% if consolidated_estimated_delivery_time %}
{% if has_multiple_delivery_methods %}
<h3 class=”estimated_delivery__title”>Estimated delivery</h3>
<p>{{ consolidated_estimated_delivery_time }}</p>
{% else %}
<p>
Estimated delivery <b>{{ consolidated_estimated_delivery_time }}</b>
</p>
{% endif %}
{% endif %}
{% endif %}
with
{% if is_consolidation %}
{% assign first_name = customer.first_name | default: billing_address.first_name | default: shipping_address.first_name | default: ‘there’ %}
Thanks, {{ first_name }}. We received your shipping selection and charges for your consolidated shipment. We’ll start preparing your items and email tracking once your shipment goes out.
{% elsif requires_shipping %}
{% assign first_name = customer.first_name | default: billing_address.first_name | default: shipping_address.first_name | default: ‘there’ %}
{% if is_ship_later %}
Hi {{ first_name }}, you selected to ship later. Your items are not shipping yet. We will email you when your order is actually on the way.
{% else %}
{% case delivery_method %}
{% when ‘pick-up’ %}
You’ll receive an email when your order is ready for pickup.
{% when ‘local’ %}
Hi {{ first_name }}, we’re getting your order ready for delivery.
{% else %}
We’re getting your order ready to be shipped. We will notify you when it has been sent.
{% endcase %}
{% endif %}
{% if delivery_instructions != blank %}
<p><b>Delivery information:</b> {{ delivery_instructions }}</p>
{% endif %}
{% if consolidated_estimated_delivery_time %}
{% unless is_ship_later %}
{% if has_multiple_delivery_methods %}
<h3 class=”estimated_delivery__title”>Estimated delivery</h3>
<p>{{ consolidated_estimated_delivery_time }}</p>
{% else %}
<p>
Estimated delivery <b>{{ consolidated_estimated_delivery_time }}</b>
</p>
{% endif %}
{% endunless %}
{% endif %}
{% endif %}
- Optional improvement: Paste a Ship Later callout at the bottom of the email body Use Ctrl+F and look for <p>{{ email_body }}</p>
In the next line, paste:
{% if is_ship_later %}
<p><strong>Ship later selected.</strong> Your order is confirmed, and your items will remain pending until you choose what to ship.</p>
{% endif %}
- Optional improvement: Update the main button label to “Manage Shipping”. Use Ctrl+F and look for <td class=”button__cell”>
Replace the following
<td class=”button__cell”><a href=”{{ order_status_url }}” class=”button__text”>View your order</a></td>
With
<td class=”button__cell”>
<a href=”{{ order_status_url }}” class=”button__text”>
{% if is_consolidation %}View consolidation order{% elsif is_ship_later %}Manage shipping{% else %}View your order{% endif %}
</a>
</td>
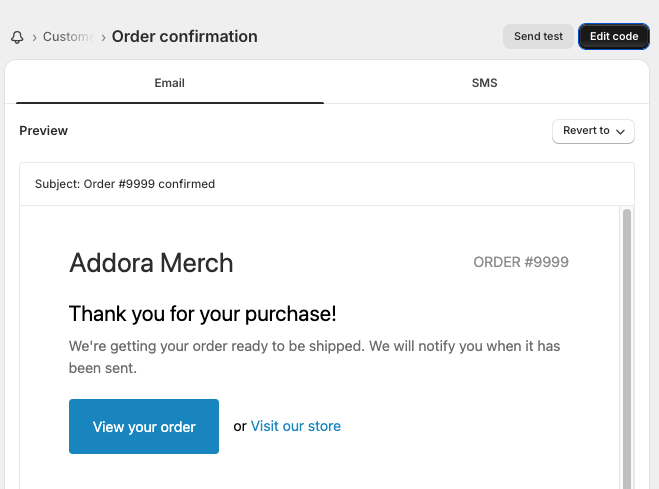
This is what your customer will receive when they make a purchase using the app’s shipping method:

6. Order Summary
Add the Customer Orders block to a dedicated page so customers can view their Ship Later purchase history, select which orders to ship, and proceed to checkout.
Customers must be logged in to see their orders. Guests will see a prompt to log in or register.
- Go to Shopify Admin → Online Store → Pages → Add page. Name it “Order Summary”, make it Visible,
then save. - Go to Content → Menus → Main menu. Add a menu item labeled “Order Summary” that links to the page you created and click save.
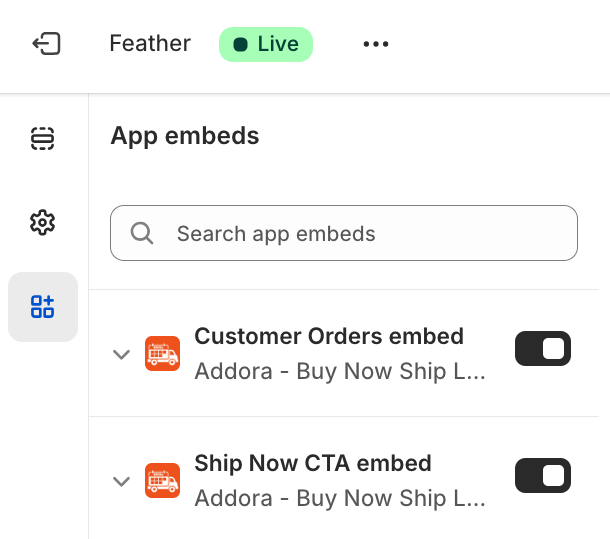
- Open Online Store → Themes → Edit. In the theme editor, open App embeds and enable Customer Orders embed and Ship Now CTA embed.
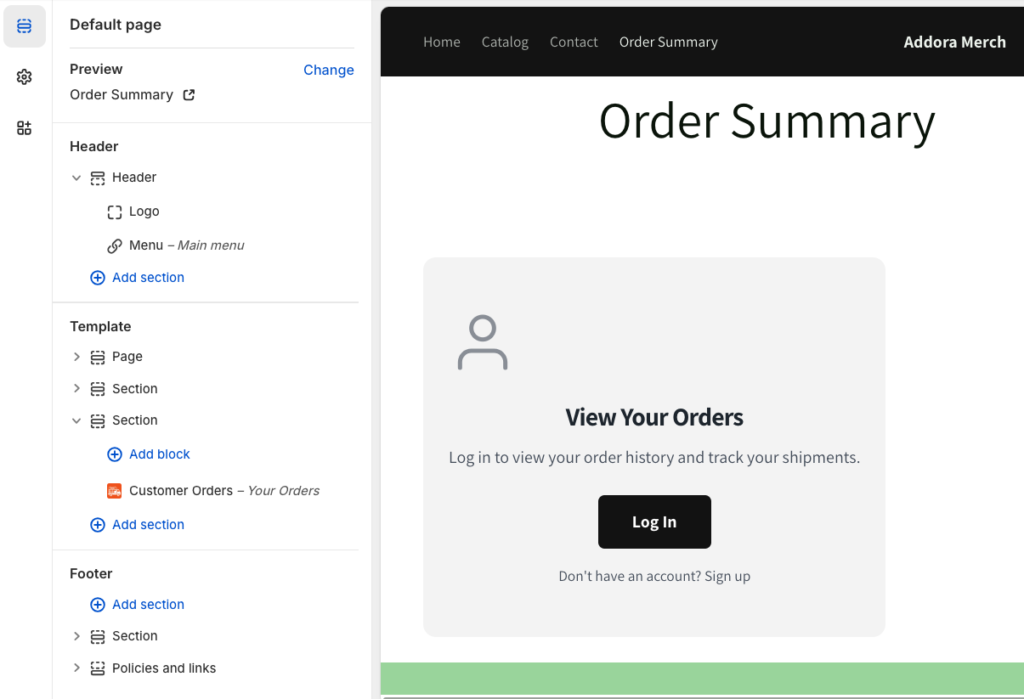
- On the right side showing the live preview of your store, click and go to the Order Summary page.
- On the left panel, under Template → add Section → go to Apps and click Customer Orders. This enables customers to see their order history.
- Click Save in the top right, then Exit.
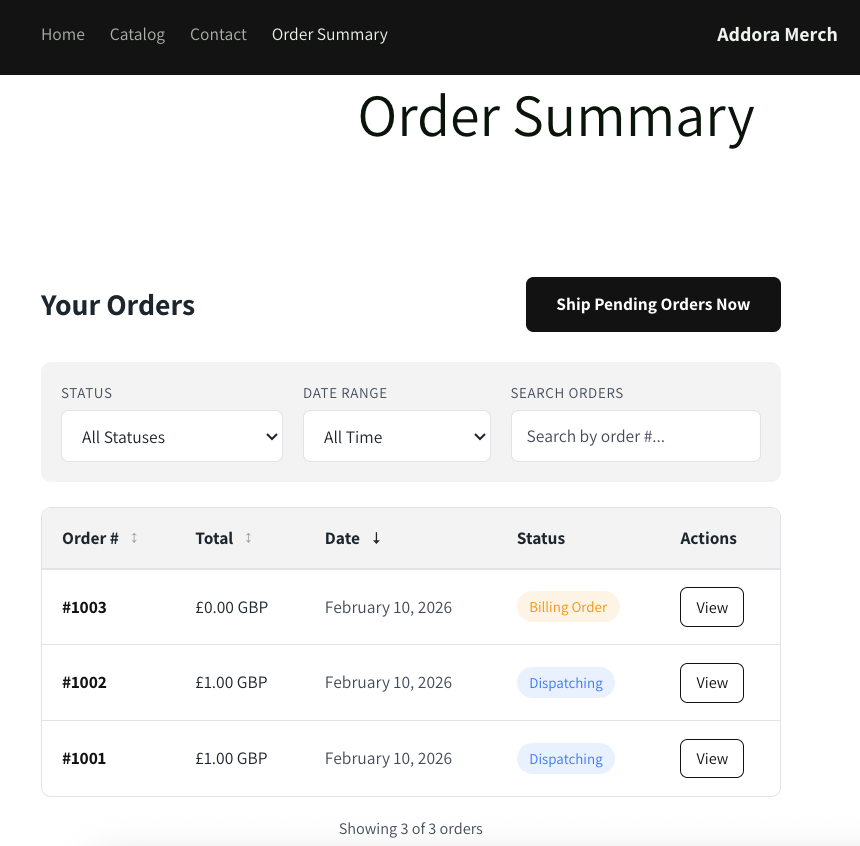
This is what the Order Summary will look like for your customer:
7. Pending Orders
An overview of currently pending orders
8. Help
Our Addora support team is dedicated to ensuring your success. Whether you have questions about setup, need help troubleshooting, or want to learn more about our features, we are just an email away at [email protected]
Check our FAQ in case we’ve already answered your question.
We try to respond within 24 hours during business days.